Claude Code Memory System: The Complete 3-Level Setup Guide
AI Infrastructure Lead
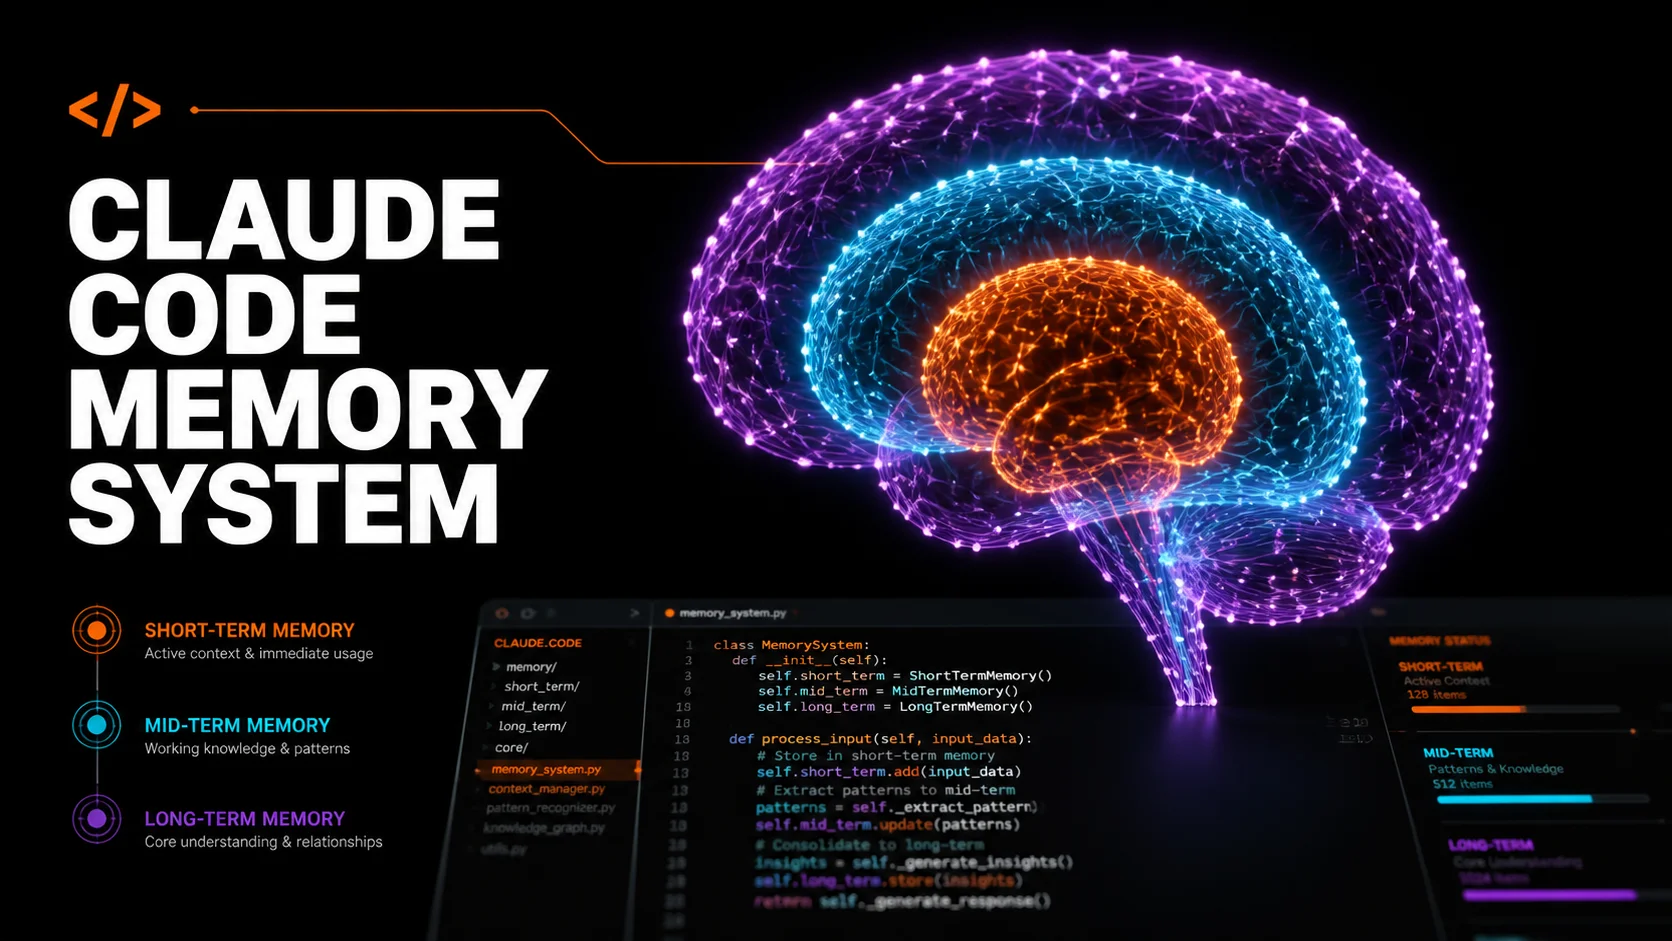
Table of Contents
- Why Most AI Memory Systems Fail
- The 3-Level Memory Architecture
- Level 1: Short-Term Memory (CLAUDE.md + Auto Memory)
- Level 2: Mid-Term Memory (Obsidian Vault)
- Level 3: Long-Term Memory (Pinecone Vector DB)
- Pinecone vs Obsidian: Which Do You Need?
- Step-by-Step Setup Guide
- Best Practices That Actually Matter
- FAQ
Why Most AI Memory Systems Fail
Every Claude Code session starts with a blank slate. You open a fresh terminal, type a prompt, and Claude has zero context about your project, your preferences, or the three hours you spent debugging yesterday. The Claude Code memory system exists to solve exactly this problem — but most developers either ignore it entirely or configure it so poorly that it might as well not exist.
The core issue is that language models are stateless by design. The context window is a whiteboard that gets wiped clean after every conversation. Without a deliberate memory architecture, you are doomed to re-explain the same project structure, the same coding conventions, and the same architectural decisions every single session.
After testing dozens of memory configurations across production projects, a clear pattern emerges: the developers who get the most out of Claude Code all converge on a 3-level memory stack. Each level serves a different purpose, operates at a different time horizon, and solves a different class of the "Claude forgot everything" problem.
The 3-Level Memory Architecture
Think of the Claude Code memory system like human memory. You have working memory (what you are actively thinking about), episodic memory (what happened recently), and long-term memory (deep knowledge accumulated over years). Each serves a fundamentally different function, and collapsing them into a single CLAUDE.md file is the number one mistake developers make.
Level 1: Short-Term
CLAUDE.md + Auto Memory
Project rules, coding standards, build commands. Loaded every session automatically. Target: under 200 lines.
Level 2: Mid-Term
Obsidian Vault
Structured knowledge base with linked notes. Architecture decisions, learnings, reference docs. Loaded on demand.
Level 3: Long-Term
Pinecone Vector DB
Semantic search across thousands of past conversations, codebases, and documents. Infinite capacity, instant retrieval.
The key insight: each level has a different update frequency and context cost. Level 1 loads every session (so keep it lean). Level 2 loads on demand (so it can be comprehensive). Level 3 never loads in full — Claude queries it for specific information when needed. This layered approach means you get persistent memory without burning your entire context window on historical data.

Level 1: Short-Term Memory (CLAUDE.md + Auto Memory)
This is where 90% of developers stop — and honestly, for many projects, it is sufficient. Claude Code has two built-in short-term memory mechanisms that load at the start of every conversation:
CLAUDE.md Files — Your Standing Orders
CLAUDE.md is a markdown file that Claude reads before anything else happens. Think of it as standing orders for every session. It supports four scope levels, from broadest to most specific:
| Scope | Location | Use Case |
|---|---|---|
| Managed Policy | /etc/claude-code/CLAUDE.md |
Org-wide security policies, compliance |
| User | ~/.claude/CLAUDE.md |
Personal preferences, shortcuts, style |
| Project | ./CLAUDE.md |
Team standards, architecture, build commands |
| Local | ./CLAUDE.local.md |
Personal project prefs (gitignored) |
All levels load simultaneously — they stack, not override. More specific files are read last, so project rules effectively take precedence over user rules for the same topic.
Auto Memory — Claude Takes Its Own Notes
Auto memory is the system where Claude writes notes for itself. When you correct Claude ("no, use pnpm not npm") or it discovers something useful ("this project uses 2-space indentation"), it saves a note to ~/.claude/projects/<project>/memory/. The first 200 lines of the MEMORY.md index file load at session start.
You can review and edit auto memory at any time by running /memory in a session. Everything is plain markdown. Delete notes that are wrong, edit ones that are outdated. This is your agent improving itself over time — the more you correct it, the better it gets.
.claude/rules/ — Modular, Scoped Instructions
For larger projects, dumping everything into one CLAUDE.md becomes unwieldy. The .claude/rules/ directory lets you split instructions into topic-specific files with optional path scoping:
your-project/
├── .claude/
│   ├── CLAUDE.md              # Core project rules (under 200 lines)
│   └── rules/
│       ├── code-style.md      # Always loaded
│       ├── testing.md         # Always loaded
│       └── api-design.md      # Path-scoped: only loads for src/api/**
Path-scoped rules are a game-changer for monorepos. Your frontend team's React conventions only load when Claude touches src/components/**/*.tsx files, while your backend API rules only fire for src/api/**/*.ts. Zero wasted context.

Level 2: Mid-Term Memory (Obsidian Vault)
Level 1 handles session-to-session persistence. But what about knowledge that spans multiple projects? Architecture decisions that inform every codebase you touch? Brand guidelines, client requirements, API reference sheets, or the 47 things you have learned about deploying Next.js to Vercel?
This is where Obsidian enters the picture. Obsidian is a free, local-first note-taking app that stores everything as plain markdown files. Claude Code can read markdown files natively — no plugins, no MCP servers, no API keys. You just point Claude at your vault and it has access to your entire knowledge base.
Structuring Your Obsidian Vault for Claude
The vault structure matters more than you think. Claude navigates file trees by name, so descriptive filenames and logical grouping are essential:
obsidian-vault/
├── context/
│   ├── brand-voice.md         # How the brand sounds
│   ├── audience-profile.md    # Who you're building for
│   └── tech-stack.md          # Your standard stack + versions
├── architecture/
│   ├── database-patterns.md   # Schemas, naming, indexing rules
│   ├── api-conventions.md     # REST/GraphQL standards
│   └── deployment-pipeline.md # CI/CD configuration
├── learnings/
│   ├── 2026-04-next15-ssr.md  # What broke and why
│   ├── 2026-03-convex-limits.md
│   └── debugging-patterns.md  # Reusable debugging approaches
└── references/
    ├── api-keys-guide.md      # Where keys live, how to rotate
    ├── client-requirements.md # Current project constraints
    └── competitor-notes.md    # Market intelligence
The critical difference from Level 1: this content does not load at session start. Claude accesses it on demand when it needs specific information. This means your vault can be 500 files deep without burning a single context token until Claude actually reads a file.
Connecting Obsidian to Claude Code
Two approaches work well:
Option A: --add-dir Flag
Run claude --add-dir ~/obsidian-vault to give Claude read access to your vault alongside your project. Files load on demand, not at startup.
Option B: Symlink Into Project
Create a symlink: ln -s ~/obsidian-vault .claude/knowledge. Claude discovers it naturally when browsing the project. Add the symlink to .gitignore.
Then add a single line to your CLAUDE.md: Before starting complex tasks, check .claude/knowledge/ for relevant context. That is all it takes. Claude will browse the vault, find relevant files by name, and read the ones that apply.
The Learnings Loop
The most powerful pattern at Level 2 is the self-improving learnings loop. After every significant session, Claude appends what worked and what failed to a learnings.md file. Over time, this file becomes a rich record of evolved preferences, discovered edge cases, and accumulated process improvements. Agents that accumulate structured memory across runs compound their effectiveness — agents that do not, plateau.
If you are already using Claude Code skills and plugins, each skill can maintain its own learnings file. The content editing skill learns your voice over time. The deployment skill learns which checks matter for your infrastructure. Each agent becomes individually smarter.
Level 3: Long-Term Memory (Pinecone Vector Database)
Levels 1 and 2 handle most use cases. But they both share a limitation: Claude has to know where to look. If your Obsidian vault has 200 files and the relevant context is buried in learnings/2026-02-stripe-webhook-retry.md, Claude might not think to check that file when debugging a payment issue three months later.
This is where vector databases solve a fundamentally different problem. Pinecone stores text as high-dimensional vectors (embeddings) that encode semantic meaning. Instead of searching by filename or keyword, you search by meaning: "What do I know about handling Stripe webhook retries?" returns the exact paragraph from that buried learnings file, even if it never uses the word "retry."
What Goes Into the Vector Database
Not everything belongs in Pinecone. The best candidates for vector storage are:
- Past conversation transcripts — Claude Code saves session transcripts as JSONL at
~/.claude/projects/. Index these and Claude can recall what you discussed last week. - Documentation chunks — API docs, internal wikis, design docs. Chunked into 500-1000 token segments with overlap.
- Code snippets with context — Functions, components, and utilities with their docstrings and usage patterns.
- Decision logs — Why you chose Convex over Supabase. Why you switched from REST to GraphQL. Architectural decisions with full reasoning.
- Bug reports and resolutions — The exact error, what caused it, and how it was fixed. Gold for future debugging.
Connecting Pinecone to Claude Code
The integration happens through an MCP (Model Context Protocol) server. Several open-source implementations exist, but the pattern is consistent: Claude Code calls a memory_search tool with a natural language query, the MCP server converts it to a vector embedding, queries Pinecone, and returns the most semantically relevant chunks.
# Example MCP config in .claude.json
{
  "mcpServers": {
    "memory": {
      "command": "node",
      "args": ["path/to/pinecone-memory-mcp/index.js"],
      "env": {
        "PINECONE_API_KEY": "your-key",
        "PINECONE_INDEX": "claude-memory",
        "OPENAI_API_KEY": "your-key"
      }
    }
  }
}
With this configured, Claude automatically searches your memory when it encounters a problem it suspects it has seen before. The context window stays clean because only the relevant chunks are injected — not the entire knowledge base.

Pinecone vs Obsidian: Which Do You Actually Need?
This is the question everyone asks, and the answer is simpler than most guides make it: start with Obsidian, add Pinecone when you need it.
| Factor | Obsidian | Pinecone |
|---|---|---|
| Cost | Free | Free tier (100K vectors) |
| Setup Time | 5 minutes | 30-60 minutes |
| Search Type | Filename + content (exact) | Semantic (meaning-based) |
| Scale | Hundreds of files | Millions of chunks |
| Data Privacy | 100% local | Cloud-hosted |
| Dependencies | None | MCP server + embedding API |
| Best For | Individual devs, small teams | Large codebases, multi-project orgs |
The honest truth: most developers working on 1-3 projects will never need Pinecone. Obsidian gives you 80% of the value with 20% of the complexity. Add Pinecone when you have more than a few hundred documents, when you need to search past conversation transcripts, or when the knowledge base is too large for Claude to navigate by browsing filenames.
The two also stack well. Use Obsidian as your primary knowledge base (you maintain and edit it like a wiki) and pipe everything into Pinecone as a search index. Write in Obsidian, search in Pinecone. Best of both worlds.

Step-by-Step Setup Guide
Here is the exact sequence to set up all three levels from scratch. Start with Level 1 today; add Level 2 this week; consider Level 3 when you hit the limits of file-based search.
Level 1 Setup (5 minutes)
- Run
/initin your project to generate a starter CLAUDE.md - Add your build command, test command, and deployment steps
- Add 3-5 coding conventions Claude should always follow
- Create
~/.claude/CLAUDE.mdwith your personal preferences (indentation, comment style, preferred libraries) - Verify auto memory is enabled: check
/memoryin a session
Level 2 Setup (30 minutes)
- Install Obsidian (free, all platforms)
- Create a vault at
~/claude-knowledge/with the folder structure shown above - Write 3-5 foundational files: tech stack, brand voice, architecture decisions
- Add to CLAUDE.md:
Reference knowledge is available at ~/claude-knowledge/. Read relevant files before complex tasks. - Create a
learnings.mdand add a wrap-up instruction to your CLAUDE.md:After significant work sessions, append learnings to ~/claude-knowledge/learnings/
Level 3 Setup (1 hour)
- Create a free Pinecone account and create an index (dimension: 1536 for OpenAI embeddings, 3072 for text-embedding-3-large)
- Install or build a Pinecone MCP server (several open-source options exist on GitHub)
- Configure it in
.claude.jsonwith your Pinecone and OpenAI API keys - Write an ingestion script to chunk and embed your existing knowledge (Obsidian vault, past transcripts, docs)
- Test with: "What do I know about [topic from your vault]?" — Claude should find and return the relevant context
Best Practices That Actually Matter
Keep CLAUDE.md Under 200 Lines
Every line consumes context tokens every session. Move detailed references to .claude/rules/ or your Obsidian vault. CLAUDE.md should be dense, not comprehensive.
Write Verifiable Instructions
"Use 2-space indentation" beats "format code properly." Specific instructions get followed; vague guidance gets interpreted creatively.
Audit Auto Memory Monthly
Run /memory and review what Claude has saved. Delete outdated notes, correct wrong assumptions. Stale memory is worse than no memory.
Consolidate Learnings Weekly
Compress older learning entries into summaries. A 2,000-line learnings file slows Claude down. Keep the active file under 300 lines and archive the rest.
Use /init for New Projects
The /init command analyzes your codebase and generates a starting CLAUDE.md automatically. It discovers build commands, test patterns, and project conventions you might miss.
Separate Brand from Agent
Brand context (voice, audience, standards) belongs in shared files. Agent-specific rules belong in per-project or per-skill configs. Never duplicate brand info across multiple CLAUDE.md files.
One final pattern worth highlighting: if you use Claude Code across multiple machines (laptop + desktop, or local + cloud), remember that auto memory is machine-local. The ~/.claude/projects/ directory does not sync automatically. Use a file sync tool like Syncthing or store your Obsidian vault in a synced location if you need cross-machine memory. If you are working on a team project, check out how to run Claude Code from a USB drive for a portable setup that carries your memory with you.
Frequently Asked Questions
~/.claude/projects/<project>/memory/.~/.claude/CLAUDE.md for personal preferences across all projects, or use .claude/rules/ for path-scoped instructions. Run /init to generate a starter file automatically.--add-dir or by symlinking your vault into the project directory. Claude reads the markdown files directly — no plugins or MCP servers needed. Files load on demand, not at startup, so even large vaults do not waste context tokens./memory to review and edit both.Recommended AI Tools
played.fm
Sell your music and keep 100%: played.fm is a direct-to-fan store + sync marketplace with 0% commission, no gatekeepers, and no bans — a strong fit for AI musicians.
View Review →OpenCode
The open-source AI coding agent: terminal-first TUI, 75+ model providers, LSP context, subagents, and privacy-first design. Free software, ~180K GitHub stars.
View Review →Exa
The neural web search API for AI agents: embeddings-based retrieval, cited highlights, sub-180ms latency, and an MCP server. 20,000 free requests/month.
View Review →Google Antigravity
Google's agent-first IDE: run a fleet of AI agents from a Manager surface, on Gemini 3 Pro, Claude Sonnet 4.5, or OpenAI models. Free in public preview.
View Review →